Archive for the ‘raw recipes’ Category

Pumpkin Smoothie

raw pumpkin recipe

Despite the fact that I hate winter, I do look forward to all of the winter holiday flavors!  Pumpkin, peppermint, apple spice, etc….mmmm!  Pumpkin is especially a favorite of mine.  In preparation for my friend’s “Everything Pumpkin” party last night, I discovered a wonderful new way to enjoy raw pumpkin.  Check out this easy delicious Pumpkin Smoothie recipe from In The Raw.  Even my junk-food loving nephew found this irresistable!  🙂

Pumpkin Smoothie

1 banana, frozen
1 C almond milk
1 C pumpkin, grated
1/2 tsp cinnamon
1/4 tsp ground ginger
1/4 tsp allspice
1/4 tsp nutmeg
agave nectar, stevia or raw honey to taste

Combine ingredients in a high-powered blender until creamy.

I ended up using about 1/4 cup of raw honey and 1/4 cup raw sugar.  I found the honey really made the flavor, so don’t leave that out!  You could probably substitute the raw sugar for more honey or agave.  Experiment and enjoy!

Raw Dog Treats – Good For You and Your Dog!

Some of my raw food experiments just don’t turn out that well.  If that happens to you, too, I’m glad I’m not the only one.  I tried creating a raw cracker the other night out of a variety of grains, which ended up a little on the dense and chewy end.  The flavor isn’t bad, but I wanted a light, crispy cracker, not a dense chewy one. 

Fortunately, my dog was around, which he always is when I’m in the kitchen.  I let him try almost everything I eat because I’ve been wildly surprised at times at what he will scarf down.  He loves watermelon, coconuts, tomatoes, kale sticks, baby carrots (not regular carrots), broccoli, cabbage, marinated zucchini, spirulina, hemp seeds…just to name a few. 

He’s never been a fan of dog biscuits, but he really likes most of the crackers I make, so I let him try the ones I made the other night and sure enough…he likes ’em! So he now has his own tupperware full of dense, chewy raw crackers. What a treat. 

Thought I’d pass along the recipe just in case anyone else is as obsessively dedicated to their pet’s diet as I am…or if you just like a really dense cracker!

1 cup short grain brown rice (soaked 48 hours)
1 cup sprouted quinoa
1 cup sprouted buckwheat groats
1/4 cup ground flaxseeds
1/4 cup sesame seeds
2 cloves garlic
1/4 cup tamari
1 tsp sea salt

Blend the rice first in the food processor so it can get ground as finely as possible.  This may not get very fine, which is the reason for the denseness.  (Next time I’m going to leave it out or cut way back for a lighter cracker.) 

Next add the quinoa and flax seed until it’s ground in with the rice.  Then put everything else in and process until it makes a thick batter.  Add a little water if necessary.  Spread on a dehydrator sheet.  With a knife, cut into squares. Dry for 12-16 hours.

Disclosure:  I know there is some skepticism about feeding dogs things such as rice, garlic and soy products (tamari), so if these things make you nervous, leave them out.  Garlic in small amounts seems to be acceptable for a dog.  I don’t know if tamari is anything to get worked up about, actually, but if so use some olive oil instead.  🙂

Make Your Own Almond Butter

http://www.youtube.com/v/6azbXNgi6Ps?fs=1&hl=en_US

Making your own almond butter is sooo easy! 

Start with 2 cups of dry almonds.  Grind them in a high speed blender or food processor until they form a fine flour. 
Next, while the blender is still on, slowly add 2 ounces of melted coconut oil, 1 large tablespoon of raw honey and a pinch of sea salt. 

It will only take a few minutes before a nice creamy nut butter is formed.  So delicious! 

Apple Cider Smoothie

‘Tis the season of apples!  These high fiber, vitamin-rich jewels are literally falling from the trees right now.  I’ve been adding them to my smoothies in the morning and have found a delicious combination that I must share. 

I add a little apple cider vinegar to it to give it a kick and to get my hydrochloric acid going for better digestion.  ACV also helps your body absorb the minerals from your food better…great for splashing over your greens to absorb as much calcium as possible! 

Apple Cider Smoothie:

2 bananas
2 medium apples
2 Tbs apple cider vinegar
1 Cup distilled water or nut milk
Ice

Add spices to taste:
Cinnamon
Ground ginger
Vanilla
2-3 drops of Stevia

If you have these things on hand and want to amp up your nutritional content, try adding:
1-2 oz aloe vera juice
1 Tbs Vitamineral greens (order from www.healthforce.com)  or a big handful of whatever green leaves you have…kale, lettuce, chard, etc.
1 Tbs spirulina crunchies (order from www.vivapura.net)

Blend everything together and enjoy!

p.s….if you’re one of the only people in Salt Lake who doesn’t either own an apple tree or know someone who does, and you’d like some free apples, let me know…you can come harvest from my tree!

Cherry Almond Ice Cream…With or Without Worms

I went to the Farmer’s Market a few weeks ago on a quest to find organic cherries so I could experiment with a coconut milk based cherry almond raw ice cream.  All the big cherry vendors have to spray because the worms just love them…who can blame ’em?

I talked to a couple of the big vendors and asked them about their spraying processes.  One lady told me they only spray once and then they have to wait a while to pick them until they the residue from the spray is gone.  That didn’t sound too bad to me, so I thought that may be my best option…but then, I eyed a lady selling soaps and trinkets and she had one little basket of cherries sitting at the base of her table. 

So, I asked her if they were sprayed.  She said no.  “Did you get a lot of worms, then?” I asked.  She said no…it there’s a worm hole, the worm has probably already crawled out.  I said, “Perfect, I’ll take the rest of what you’ve got.”

I was so excited about my purchase, that I just couldn’t wait to get home to start enjoying it.  So, I popped a few sweet organic cherries into my mouth and savored their juicy goodness.  By the time I got home and started cleaning and cutting the cherries, I’d probably eaten about 15 or so.  I was very happy.

The bad news is, once I started cutting open the cherries, I was horrified to find worms in almost every one of them!  I cleaned and cut and washed away worm after worm with the sickening thought of how many worms I must have just consumed.  Although I’m not one for pesticides, I’m also not fond of parasites growing in my intestines.  I wonder how long they will live in there.  Eek! 

On a happier note, I removed all the worms from the cherries and froze them.  Later my niece and I made the most delicious cherry almond ice cream.  Here’s the recipe as close as I can remember it.  Just remember to check your cherries for worms.  🙂

Cherry Almond Coconut Ice Cream
1 can coconut milk
1 cup raw honey or agave
11/2 cups cherries, chopped
1 tsp vanilla
1 tsp almond extract
1/4 cup chopped almonds
1/2 cup unsweetened shredded coconut

Blend the coconut milk, 1 cup of the cherries, honey, vanilla and almond extract until smooth.  Save the other 1/2 cup of cherries, the almonds and the shredded coconut to add in to the ice cream for texture after it has been blended.  Once you have a smooth batter, you can either put it in an ice cream maker following your machines directions, or you can put it in ice cube trays to freeze and then run it through the Champion juicer with the blank blade, or cream it up again in the food processor.  Mix in by hand the remaining ingredients for texture. 

Fermented Cashew Cheese….Ridiculously Delicious!

I’ve deprived myself of cheese for years for health reasons, but that doesn’t mean I don’t miss a melted cheese sandwich every now and then or some cream cheese spread on crackers. I pretty much just don’t let myself think about it…until I was introduced to this fermented cheese made of cashews and now I can’t stop thinking about it! This is the best substitute for real cheese I’ve probably ever tasted because you can actually get a bit of that sharp, aged taste in it due to this easy fermenting process.


Everyone who’s tasted it so far loves it….even my dairy farmer father ( I didn’t tell him it was made of cashews until after he tried it.)  My sister-in-law is lactose intolerant and is already making her own batches of this stuff so it can become a permanent staple in her diet.  It’s got such a great texture and so versatile with flavorings that it’s the perfect cheese substitute.

I got the original recipe from The Sunny Raw Kitchen. Her basic recipe is:

3 cups cashews, soaked 14- 16 hours
3 capsules probiotics
2/3 cups rejuvillac or distilled water

In high speed blender, blend the soaked cashews with probiotics and rejuvelac or water until smooth.

Line a sieve with a double thickness of cheesecloth and place over a bowl. Transfer the mixture to the sieve, drape the cheesecloth over the top, cover with a towel and leave in a warm place to ripen for 14-16 hours.
Season according to one of the following recipes (or come up with your own variation!)
Alternatively, shape the mixture into a round, place in a covered container, and refrigerate for at least 24 hours, or until it firms up.

Store in fridge in airtight container for up to 3 or 4 days.

I taught how to make this cheese at my last raw foods class. If you want to watch, this short video explains it all:


These are a couple of my favorite flavorings.  Enjoy!

1. 1 TBS nutritional yeast                                                
    ¼ tsp onion powder                                                           
    1/8 tsp nutmeg                                                                        
    ½ tsp salt                                                                             

2.  1 TBS nutritional yeast

     1/4 tsp onion powder
     1 half lemon, juiced
     3/4 tsp garlic powder
     1/4 tsp salt
     1 TBS dried basil
     1 tsp dried thyme
     1/4 cup sun-dried tomatoes, chopped

3.  1 tsp onion  powder
     1/2 lemon, juiced
     1 TBS nutritional yeast
     1/4 tsp salt
     1 TBS rosemary

     1/4 tsp salt

Coconut Bliss…My Own Version

My only weaknesses with dairy are ice cream, frozen yogurt and an occasional bite of cheese…but that’s pretty rare.  Mostly it’s the ice cream and yogurt that make me weak in the knees.  That’s rare, too, because I’ve also been plagued (or blessed…however you want to look at it) with an intolerance for lactose, so I rarely allow myself to indulge.  At least I can enjoy a rice or soy substitute now and then…and most recently Coconut Bliss chocolate cream bars.  Yummmm…..I’m thinking about them sitting in my freezer right now and just might have to take a break writing this to get get one!

This month Britta and I are focusing our raw classes on dairy substitutes, and my class will specifically address the divine desserts.  I’m determined to make my own raw homemade version of Coconut Bliss.  It can’t be hard…there are only 5 ingredients…agave, cacao, coconut milk, vanilla and guar gum for texture.  How hard can it be?

I decided to give it a try, so I just concocted my first batch and it’s waiting patiently in the freezer to set up.  I’m confident this will be almost as good as the real deal, because I could hardly stop tasting it before I put it in the freezer.  Coconut is definitely my favorite ice cream base!  Plus, coconuts are high in germ fighting and heart protective properties, and the fat in coconut actually stimulates metabolism!  Read more about the great health benefits of coconut here.

As for the ice cream, these are the ratios I used:

Coconut Cacao Bars

1 cup coconut milk
4 TBS cacao powder 
1/2 Cup dark agave (I used Essential Living Foods brand because I trust it to be raw)
1 tsp vanilla
3 ice cubes

Blend in the Vitamix.  I poured the mixture into an ice cube tray and when it sets up, I will pass it through the Champion juicer using the blank blade….or maybe I’ll just eat them straight from the ice cube tray.  We’ll see how much patience I have. 

I’ll let you know how it goes.  In the meantime, if you just can’t wait to make your own, run down to your nearest health food store and grab a box of the original Coconut Bliss Bars.  You’ll be very happy you did.  🙂

Sauerkraut

I’m experimenting with sauerkraut for my class on Tuesday.  I’ll be honest, it’s a little intimidating and my first batch didn’t turn out so well.  I think I let too much air get to it, and didn’t give it a chance to fully ripen before trying to use it.  Another batch is on the counter, though, and so far it seems to be turning out just fine.  Crossing my fingers!

I have a friend who says sauerkraut is disgusting and nobody likes it so I shouldn’t even bother trying to make it.  I tried explaining to him the health benefits of it, but he didn’t buy it.  He still thinks it’s gross.

Personally, I like a good, raw sauerkraut. Something about the tangy, juicy crunchiness of it that’s so satisfying to me.  It almost makes me wish for a bratwurst and catsup to get the full experience, but then I remember that bratwursts make me gag.  So, I just eat it with salad or by itself.

As for the health benefits, according to Dr. Mercola, fermented foods are so good for the digestive tract that they are now considered to be probiotics!  They also support immune function, including an increase in B vitamins, omega-3 fatty acids, lactase and lactic acid, digestive enzymes and other immune chemicals that fight off bacteria and even cancer cells.  To read Dr. Mercola’s complete article, click here.

If you’re like my friend, though, and you still think sauerkraut is disgusting, maybe try adding some other fermented foods to your diet like kefir, plain yogurt, miso, or even raw, fermented olives and pickles!  Who doesn’t like a good pickle?  Many health food stores offer an antipasto bar with all sorts of fermented veggies.  Add a few to your salads and enjoy the benefits of increased probiotics.

PS..if the sauerkraut turns out well, I’ll post the recipe.  If not, I’ll do some more research until I find a good one and let ya know.  🙂

Green Smoothie Do’s and Dont’s

I recently reread Victoria Boutenko’s book, “Green Smoothie Revolution” in preparation for my Greens raw class last Tuesday…and wow! This woman never ceases to blow my mind!

She’s done over 15 years of research on raw foods and greens in particular, and cured herself, her husband and two children of deathly diseases including diabetes, arrhythmia, edema, hyperthyroidism, rheumatoid arthritis, allergies and asthma. Although doctors told them they were incurable, she listened to her intuition and started experimenting with food. Now, the whole family lives a raw lifestyle and is healthy and completely cured of all health issues.

I highly recommend reading her books if you’re serious about understanding your greens. She addresses issues such as:

how to get enough protein and vitamin B12

why it’s important to rotate your greens

why greens are a key ingredient in human nutrition

using wild edibles

food combining in Green Smoothies

valuable tips and tricks for smoothie preparation

She also includes a whole bunch of great smoothie recipes for beginners, children, pets and the adventurous souls!

I shared some of her tips for making green smoothies at my last class, and I’ll share them here as well. If you’re interested in learning more about this amazing, healing drink and raw health in general, visit the Raw Family Website

Guidelines for Green Smoothies (for optimal digestion)

1. Sip smoothie slowly, mixing it with saliva for better absorption.

2. Don’t add anything to your smoothie except greens, fruit and water.

3. Drink your smoothie by itself, not as part of a meal.

4. Don’t add starchy veggies such as carrots, beets, broccoli stems, zucchini, etc.

5. Don’t add too many ingredients to one smoothie. Keep it simple!

6. Rotate your green leaves to avoid toxic reactions to alkaloids found in greens.

7. Choose organic whenever possible to avoid pesticides and toxic chemicals.

Rosemary Garlic Mashed Jicama Instead of Potatoes

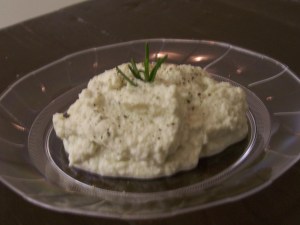
It almost looks like real mashed potatoes, doesn’t it? Like I said before, I’ve tried several different raw substitutes for mashed potatoes…usually made from cauliflower, but never really liked the way they’ve turned out. This one with jicama and cashew is by far my favorite.

See the video below from our class where Britta shows how to make this tasty dish. Note that she used the Blendtec blender because that’s what we had at the class, but it actually turns out creamier and is easier to blend using a food processor. Hope you enjoy!

Rosemary Garlic Mashed Potatoes

4 c peeled and chopped jicama (From the legume family; called the Mexican Potato and Chinese Turnip, they are high in Vitamin C, low sodium, and available year-round)

2 c cashews, soaked 1 – 2 hours

1 t. sea salt

1 – 2 t chopped fresh rosemary

1 t minced garlic

2 t nutritional yeast (high in Vitamin B-12)

Black pepper to taste

Process jicama in food processor until grain like consistency. Press out liquid with cheesecloth or through sieve. Place in Vitamix (or other blender) with reaming ingredients and blend until well combined. Serve immediately or warm in dehydrator until ready to serve. Serves 4.

http://www.youtube.com/v/Tas1hosMIoU&hl=en&fs=1